Wednesday 16 June 2010

Putting a watermark on your image using Word

Okay so I had an email asking me how i put my watermarks on images with word and not photoshop, i thought it would be easier to post it here thank email it as it would take up tonnes of memory lol
1. Open a blank word document
2. Insert the photo of your creation

3. I usually crop my photo at this point

4. I don’t know what version of Microsoft you’re using but on mine I click on the picture and I can click on the format tab underneath picture tools. Then I click on text wrapping and select behind text. If you’re using the older version of Microsoft then try right clicking on your image and selecting format picture and it should be the same from there.


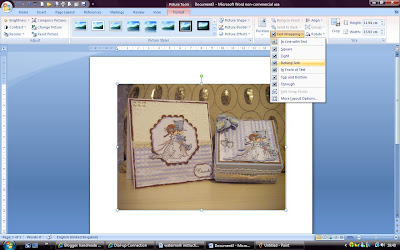
5. I then insert my watermark and do the same as above but click on in front of text.

6. You can then move the watermark about and get it in the right position


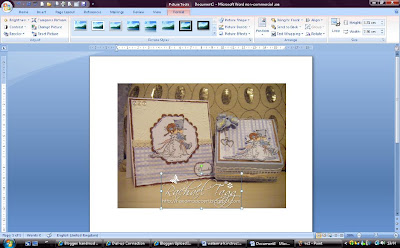
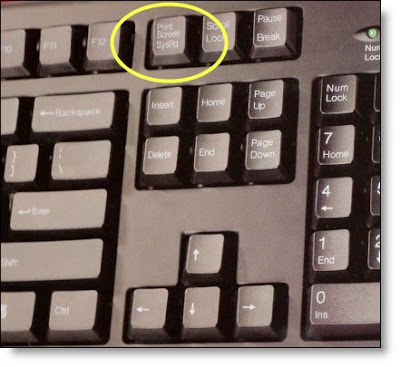
7. Now is where it gets to be a bit of a faf lol click “Print Screen” on your keyboard.


8. Open paint.

9. Then from the drop down menus select edit and then paste.


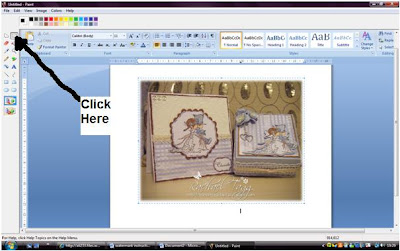
10. You should then see your Microsoft screen in paint.


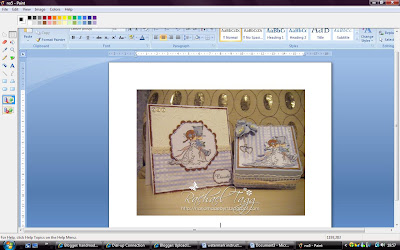
11. Hopefully you can see from the picture but from the tool bars down the left hand side you need to select the top right hand corner one which looks like a square made out of dots.


12. Once you have selected that you can click and drag a box around your image.

13. Then right click your image and select copy.


14. Now open a blank paint and click on edit from the drop down menus and then paste.


15. Hopefully you now have your image in paint ready to be saved and put on your blog :)


I really hope this makes sense to you! If not just drop me a line and let me know what your having problems with :)


Wednesday 9 June 2010

hAnglar Kit 5 :) !!!!!

Just thought i would let you know hAnglar have some more stamps up for grabs on Ebay :) Just click on the pic above to take you to the listing!
I just bought myself a set can't wait for them to arrive already haha

Wedding Anniversary

Hi Guys :)
I have somemore creations to show you!!
I made a matching card and box set for my Mum 'n' Dads wedding anniversary.
I have made this set to enter into some challenges:


Heres the card i made to follow Bev's fab sketch!!


and heres the box i made using my new toy hehe I bought a martha stewart scoreboard, i'd been looking at getting at a scor-pal but they were really had to get hold of not to mention expensive so when i saw that Martha's board was under £20 i decided to treat myself hehe
Card
Stamp: Lili of the Valley, WOJ Sentiment
Medium: Copics
Paper: Magnolia
Tools: Stylised Flowers cuttlebug embossing folder, tim holtz distresser, octagon, octagon scalloped and label 3(ireakon lol) nestabilities,
Accessories: Lace from market and crafty notions rainbow drops
Box
Stamp: Lili of the Valley
Medium: Copics and copic spika for the brides dress to make it sparkle lol
Paper: Magnolia
Tools: Tim Holtz Distresser, Martha Stewarts Scoreboard
Accessories: Flowers from local craft shop, Heart Charm from the hobby house, papermania pearls, raffia and ribbon from stash.
Thanks for popping by!!!!!!!

Nappy Cake!!

Hiya All!
Im here to show you my dt project for this weeks challenge over at Creative Inspirations where our theme is Babies :)
My cousin recently had a baby girl and when i saw what our challenge was this week i thought this Nappy Cake would be a really cute gift :) I found the idea for this on the internet there so easy to make and you can put as much or as little in as you want!!

I cant remember how many nappies i used i think it was around 40?!?!? Then you have the bottle in the middle to hold it althogether, princess tiara, Whinne the Pooh Bath Themometer, a little baby suit which says "Special Delivery", Johnsons Products and the little nail clippers.
I am currently in the middle of making another one of these for a lady at work who is expecting a little grandson soon :)
Hope you like it! Thanks For Popping By!!!